Now the test pictures. For the set-up see here.
All pictures are taken with ISO 400 and the camera set in manual mode.
 1/30s Aperture f2.8 flash
In all pictures with 1/30s only the flash contributes to the exposure. At f2.8 "Snoopy" is overexposed and the garden wall looks about right.
 1/30s Aperture f4 flash
"It's OK! Leave it! Good Boy!"
Wolfi looks about right, Snoopy is a bit to bright because he is white. That is near the right Aperture.
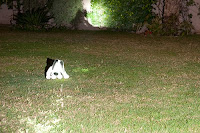
 1/30s Aperture f5.6 flash
Now at f5.6 Snoopy is about right, but you see a strong fall off of light behind him. The Garden wall is now quite underexposed.
Guide number check: ISO 400 gives a double factor to the guide number compared to ISO 100. The calculation is distance 4m x Aperture f5.6 / 2 for the ISO and results in Guide number 11.2. It is rated 14 which is close enough and after all ED has already 33 years working life behind him.
 1/30s Aperture f8 flash
With 8 Snoopy is clearly underexposed. You can also see that the garden is very dark. looking through the viewfinder I could basically see nothing. Auto Focus does also not work.
David recommended in his Seminar to use a torch light for situations like this. It is critical to keep the Auto Focus in manual at the lens and at the Camera. Otherwise the AF starts hunting when you want to take your flash picture.
I wanted to make a couple of picture with the torch light placed on the floor, ("Wolfi! Noooooo!") to get a mix between an ambient light and flash and to show the relation between time and aperture. First I tried a couple of shots without flash.
 4s Aperture f4 no flash
The torch lights Snoopy OK, but the garden is black.
 8s Aperture f4 no flash
Garden still black, Snoopy a bit overexposed.
 15s Aperture f4 no flash
Snoopy nuked, lawn very dark, the wall and plants in the back show up.
 15s Aperture f4 flash
So now I bring the flash back on. With Aperture f4 the garden is really bright, however Snoopy is still nuked by torch and flash.
The shadow of Snoopy is nice and could be a bit more emphasised by reducing the overall background brightness.
 8s Aperture f4 flash
I bring the time down one stop so that the torch light is reduced. Still way too bright.
 8s Aperture f5.6 flash
I also want to reduce the flash. Therefore I need to close the aperture one more stop. Aperture cuts ALL light that contributes to exposure. Remember: Time cuts ambient light, Aperture cuts flash and ambient.
The shadow becomes more visible. But Snoopy is still a bit too bright.
 8s Aperture f8 flash
One more Aperture down. Now the middle ground is quite dark. The shadow stands out and Snoopy is kind of OK, if not a bit on the bright side.
 15s Aperture f8 flash
Bringing the time up one stop again brings some detail into the middle ground, but Snoopy is much too bright again.
 30s Aperture 8 flash
"Enough attention for Snoopy! That is MY toy!"
You might ask so what's the point? After all we could not find a satisfactory lighting with the torch and the flash. I wanted to illustrate a few points by the strobe experiments ( i have to keep repeating the title from time to time).
1) We tested the guide number of ED. It seems to be between 11 and 12 rather than 14. Good to know for me. You also know now how to test for the guide number of your flash. It would have been much better to use a grey card leaned against snoopy for a more exact result.
2) By varying aperture and time you can see how such changes influence the picture result. Aperture is the only way to regulated a manual flash. BUT it also changes the ambient light level at the same time. The time setting only changes ambient light.
3) It is really desirable to be able to vary the power of your light sources. A flash with only full power and a torchlight with only one power setting are both less than ideal. Basically they stink! Even with a stationary setting. Theoretically you could "regulate" both by moving them closer or further away. Such an approach has practical limits in the space that is behind you when you move it away and the fact that you do not want either in the picture when you move them nearer.
4) In this set-up I wanted to also show the light fall off. I placed ED deliberately low so that the grass shows nicely the different light levels. A typical (bad) flash picture is normally quite overexposed in the foreground bright in the middle and pitch dark in the background.
So what's next? We want an automatic, we want to be able to vary our light sources. Before that one last session with ED. Above we see the shortcomings of flash when lighting an extended space. So what about a flat object? A large flat object should be lighted perfect at the right aperture?
Also never trust only one experiment you might have got something wrong without noticing.
Stay tuned for the last appearance of ED (in a leading role) in the up coming "ED and the garage door".
All pictures are taken with ISO 400 and the camera set in manual mode.
 1/30s Aperture f2.8 flash
 In all pictures with 1/30s only the flash contributes to the exposure. At f2.8 "Snoopy" is overexposed and the garden wall looks about right.
 1/30s Aperture f4 flash
 "It's OK! Leave it! Good Boy!"
Wolfi looks about right, Snoopy is a bit to bright because he is white. That is near the right Aperture.
 1/30s Aperture f5.6 flash
 Now at f5.6 Snoopy is about right, but you see a strong fall off of light behind him. The Garden wall is now quite underexposed.
Guide number check: ISO 400 gives a double factor to the guide number compared to ISO 100. The calculation is distance 4m x Aperture f5.6 / 2 for the ISO and results in Guide number 11.2. It is rated 14 which is close enough and after all ED has already 33 years working life behind him.
 1/30s Aperture f8 flash
 With 8 Snoopy is clearly underexposed. You can also see that the garden is very dark. looking through the viewfinder I could basically see nothing. Auto Focus does also not work.
David recommended in his Seminar to use a torch light for situations like this. It is critical to keep the Auto Focus in manual at the lens and at the Camera. Otherwise the AF starts hunting when you want to take your flash picture.
I wanted to make a couple of picture with the torch light placed on the floor, ("Wolfi! Noooooo!") to get a mix between an ambient light and flash and to show the relation between time and aperture. First I tried a couple of shots without flash.
 4s Aperture f4 no flash
The torch lights Snoopy OK, but the garden is black.
 8s Aperture f4 no flash
Garden still black, Snoopy a bit overexposed.
 15s Aperture f4 no flash
Snoopy nuked, lawn very dark, the wall and plants in the back show up.
 15s Aperture f4 flash
 So now I bring the flash back on. With Aperture f4 the garden is really bright, however Snoopy is still nuked by torch and flash.
The shadow of Snoopy is nice and could be a bit more emphasised by reducing the overall background brightness.
 8s Aperture f4 flash
 I bring the time down one stop so that the torch light is reduced. Still way too bright.
 8s Aperture f5.6 flash
 I also want to reduce the flash. Therefore I need to close the aperture one more stop. Aperture cuts ALL light that contributes to exposure. Remember: Time cuts ambient light, Aperture cuts flash and ambient.
The shadow becomes more visible. But Snoopy is still a bit too bright.
 8s Aperture f8 flash
 One more Aperture down. Now the middle ground is quite dark. The shadow stands out and Snoopy is kind of OK, if not a bit on the bright side.
 15s Aperture f8 flash
 Bringing the time up one stop again brings some detail into the middle ground, but Snoopy is much too bright again.
 30s Aperture 8 flash
 "Enough attention for Snoopy! That is MY toy!"
You might ask so what's the point? After all we could not find a satisfactory lighting with the torch and the flash. I wanted to illustrate a few points by the strobe experiments ( i have to keep repeating the title from time to time).
1) We tested the guide number of ED. It seems to be between 11 and 12 rather than 14. Good to know for me. You also know now how to test for the guide number of your flash. It would have been much better to use a grey card leaned against snoopy for a more exact result.
2) By varying aperture and time you can see how such changes influence the picture result. Aperture is the only way to regulated a manual flash. BUT it also changes the ambient light level at the same time. The time setting only changes ambient light.
3) It is really desirable to be able to vary the power of your light sources. A flash with only full power and a torchlight with only one power setting are both less than ideal. Basically they stink! Even with a stationary setting. Theoretically you could "regulate" both by moving them closer or further away. Such an approach has practical limits in the space that is behind you when you move it away and the fact that you do not want either in the picture when you move them nearer.
4) In this set-up I wanted to also show the light fall off. I placed ED deliberately low so that the grass shows nicely the different light levels. A typical (bad) flash picture is normally quite overexposed in the foreground bright in the middle and pitch dark in the background.
So what's next? We want an automatic, we want to be able to vary our light sources. Before that one last session with ED. Above we see the shortcomings of flash when lighting an extended space. So what about a flat object? A large flat object should be lighted perfect at the right aperture?
Also never trust only one experiment you might have got something wrong without noticing.
Stay tuned for the last appearance of ED (in a leading role) in the up coming "ED and the garage door".
 I want to use a small old Canon flash, called ED, to experiment with time and aperture. I am too lazy to use a film Camera and it is


